Hip hinging is one of the most foundational movements one needs to master. The reason being is that it’s a movement you should be using in everyday life in order to spare your back from injuries. Before we get to the hip hinge exercises let’s discuss why and how you should do it.
The following everyday activities require hip hinging:
- Loading dishes
- Picking up your kids
- Sitting down into a chair
- Picking things up off the floor
- Gardening
- And more
Why Hip Hinge anyways?
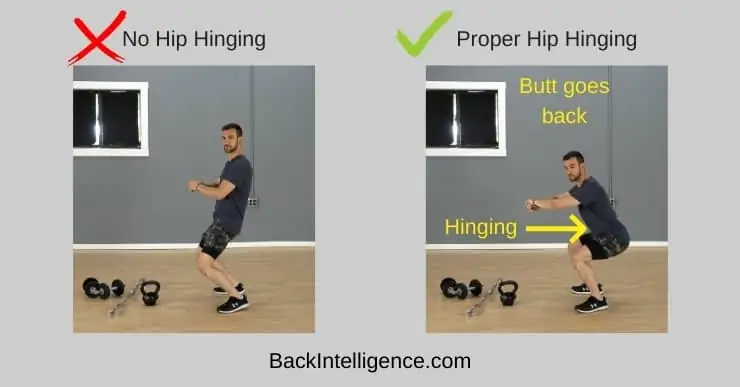
The main purpose of hip hinging is to ensure that you are bending down from your “hips”, rather than from your spine. The goal with hip hinging is to initiate the movement from your hips, and maintain a neutral spinal position the entire time. This will ensure that there is no unnecessary load being placed on your spine, discs and muscles. In turn this will lead to less spasms, injuries and less back pain. Hip hinging will also strengthen the glute muscles which can improve Anterior pelvic tilt.
Below is an image showing the correct hip hinging motion, as well as the incorrect motion.
Before we get to the exercises, let’s look at the checklist for proper hip hinging.
Hip Hinging Technique:
Lowering portion (Hip Flexion):
- Brace your core slightly
- Start the movement from your hips (Butt goes back first)
- Your upper body should naturally lean fwd, as your butt goes back
- Maintain Neutral spine position (Avoid flexing or overextending your spine)
Coming up portion (Hip Extension):
- Use your knees and glutes to initiate the coming up motion
- Push through your hips fwd, as you straighten your knees
- Avoid arching your low back as you rise up
- Keep spine in a neutral position the entire time
In order to get better with hip hinging so that it becomes second nature, it’s important to practice the movement often and to strengthen all the muscles involved. The following exercises provide different hip hinging variations and are great for all levels.
7 Hip Hinge Exercises:
1. Squat
- Stand up straight and brace your core
- Initiate the movement from your hips (butt going back)
- Allow your torso to move fwd slightly, to counter balance your hips
- Lower down to 90 degree angle with knees, or as low as comfortable for you
- As you lower down, externally rotate your knees
- Hold the down position for 3 sec before coming up
- To come up, initiate the movement from knees and then bring your hips through fwd.
- Strive for 10 reps, 3 sets
- * Keep chin tucked in
- * Keep Neutral spine
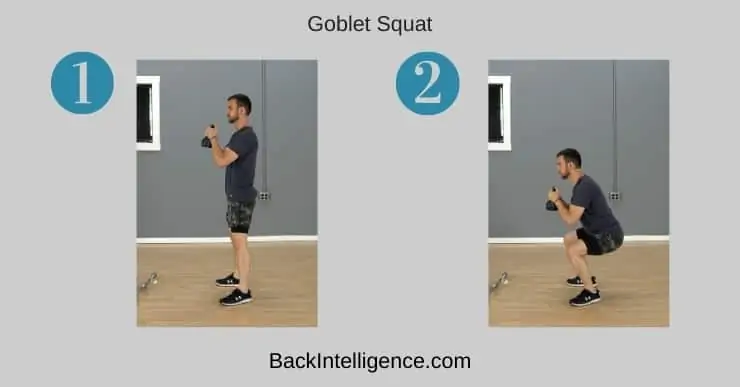
2. Goblet Squat
- Hold a Kettlebell (or dumbbell) in both hands and lock your shoulders
- Brace your core
- Initiate the movement from your hips (butt going back)
- Allow your torso to move fwd slightly, to counter balance your hips
- Lower down to 90 degree angle with knees, or as low as comfortable for you
- Hold the down position for 3 sec before coming up
- To come up, initiate the movement from knees and then bring your hips through fwd.
- Strive for 10 reps, 3 sets
- * Keep chin tucked in
- * Keep Neutral spine
The Complete Posture Fix (With Dr. Oliver)
Fix your fwd head and rounded shoulders posture, get out of pain and increase your mobility.
Learn More
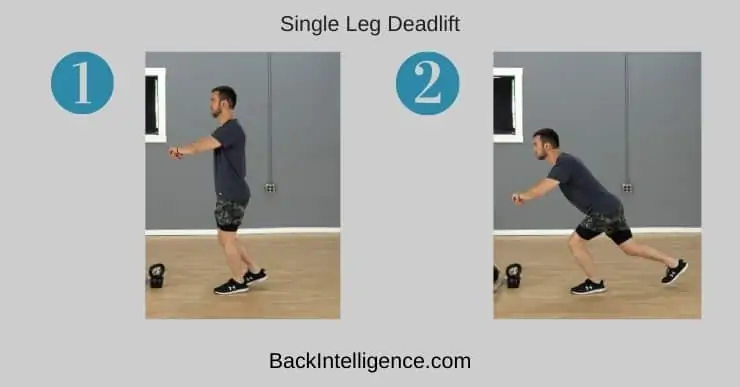
3. Single Leg Deadlift
- Stand with weight on one leg and brace your core
- Initiate the movement from the hip of your standing leg (butt going back)
- The free leg (back leg) will lift up slightly as you move more forward
- Allow your torso to move fwd slightly, to counter balance your back leg
- When you’ve reached the depth that you’re comfortable with, use your knee and glutes to rise back up into starting position.
- Strive for 10 reps, 3 sets
4. Single Leg Deadlift with Kettlebell
- Stand with weight on one leg and hold a kettlebell in the opposite arm
- Press your scapulae down and lock your shoulders down
- Initiate the movement from the hip of your standing leg (butt going back)
- The free leg (back leg) will lift up slightly as you move more forward
- Allow your torso to move fwd slightly, to counter balance your back leg
- When you’ve reached depth that you’re comfortable with, use your knee and glutes to rise back up into starting position.
- Strive for 10 reps, 3 sets
5. Romanian Deadlift with Barbell (No Weight)
- Stand with feet just outside shoulder width
- Hold a barbell without weights, and externally rotate your shoulders (feel like you’re breaking the bar), to engage your lats
- Now start hinging down from the hips (butt goes back)
- Externally rotate your knees as you lower
- Keep neutral spine the entire time
- Go down with barbell to mid-shin level
- Now use your knees and glutes to push off the floor and come up
- Squeeze your glutes when you stand up
6. Romanian Deadlift with Barbell & Weights
Same as #5 above, but now you will have more load, so be sure to really lock in your shoulders and core.
7. Romanian Deadlift with Dumbbells
- Stand with feet just outside shoulder width
- Hold 2 dumbbells (one in each arm), and press your shoulders down
- Brace your core before you start moving
- Now start hinging down from the hips (butt goes back)
- Externally rotate your knees as you lower
- Keep neutral spine the entire time
- Keep the dumbbells in front of you, and go down to mid-shin level
- Now use your knees and glutes to push off the floor and come up
- Squeeze your glutes when you stand up
Learn More
To learn how to do each of these exercises more in depth, check out the video below:
Related:
Dowager’s Hump Exercises
7 Stretches for Low Back Pain
Goblet Squat
I Threw Out My Back
3 Exercises to avoid
Corrective Exercise Specialist (NASM-CES), Certified Personal Trainer (NASM-CPT), Professional Dancer
As a long time back sufferer Leon found unique methods to alleviate his pain using natural methods including self massage, exercise/stretching and postural habits. He founded Backintelligence.com to empower others to fix their postures and ease their back pain from home.


