Anterior pelvic tilt (aka lower crossed syndrome) is a common condition that affects many of my patients.
A study published in Manual Therapy found that up to 85% of males and up to 75% of females have an anterior pelvic tilt, even if they’re not experiencing symptoms.
If you’ve ever been told that your butt sticks out or that your stomach protrudes, chances are you have an anterior pelvic tilt (APT).
Doing specific exercises will help you improve your APT and we included them below in this article.
Note: we have covered posterior pelvic tilt separately here.
What is Anterior Pelvic Tilt? And why it’s bad for you
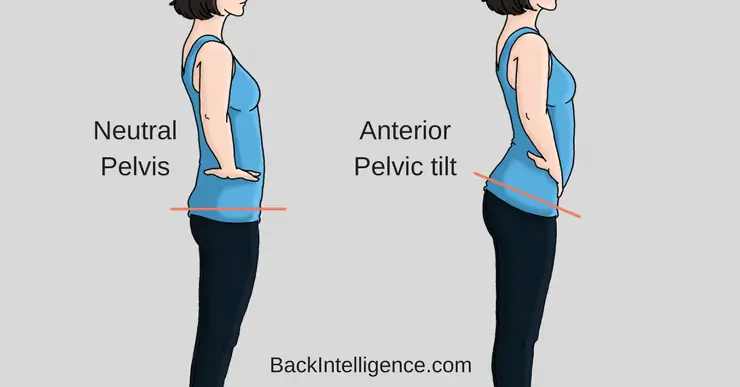
An anterior pelvic tilt means that your pelvis is rotated forward. The forward positioning of your pelvis forces the curve in your lower back to adopt a more extended position, known as hyperlordosis.
This posture is sometimes referred to as the “Donald Duck” posture!
Not only is an anterior pelvic tilt unsightly, it can lead to a variety of problems, including:
- Improper movement mechanics
- Lower back pain
- Muscle spasms
- Increased pressure on spinal vertebrae, which can lead to facet joint irritation, stress fractures, increased intervertebral disc pressure, and disc degeneration.
- Chronic pain of the back, hips, knees, and ankles
- Poor balance
What Causes Anterior Pelvic Tilt?
– Sitting or standing in poor posture
– Muscle imbalances
– Improper bending/lifting (Learn to hip hinge)
– Obesity
– Pregnancy
How to Test for Anterior Pelvic Tilt
It’s quite simple and involves measuring the angle between your posterior superior iliac spine (PSIS) and your anterior superior iliac spine (ASIS).
So, how do you do this? There are two options, either stand sideways in front of a mirror, or ask a friend to help you.
Step #1: Locate your PSIS – you can find these just below the dimples in your lower back…move your fingers a little to the left and right and you’ll feel a bony prominence on each side.
Step #2: Locate your ASIS – you can find these in front of your hips at about the same level as the PSIS (they’re pretty bony, so you should be able to find them fairly easily).
Step #3: Now, imagine a line going from your PSIS to your ASIS
Time to assess:
If you have a much larger descending line, upwards of 2 inches, that’s an indication that you may have an anterior pelvic tilt. Keep in mind that we naturally have a slight descending line between the PSIS and ASIS (about ½ an inch), and women tend to have more of an anterior pelvic tilt compared to men.
The Complete Low Back Fix (With Dr. Oliver, DC)
Ease your Low back pain, gain mobility and get back to the things you enjoy doing.
Learn More
Leon's Notes:
If the above test sounds too technical, simply refer to the image below and you should be able to tell if your pelvis is strongly titling forward.
Other ways to tell:
1. Your butt sticks out
2. You have an excessive low back arch
3. Your belly sticks out
How To Correct Anterior Pelvic Tilt
In order to fix an anterior pelvic tilt, it’s important to correct the muscle imbalance by both releasing/stretching the tightened muscles and strengthening the weakened muscles. Let's take a look at the muscles we'll be addressing.
– Hip flexors (psoas, tensor fascia latae, iliacus, and rectus femoris)
– Back extensors (erector spinae, multifidus, quadratus lumborum, and latissimus dorsi)
Weakened muscles include:
– Core muscles (rectus abdominus, internal and external obliques, and transverse abdominus)
– Gluteal muscles (gluteus maximus, medius, and minimus)
5 Stretches To Correct Anterior Pelvic Tilt:
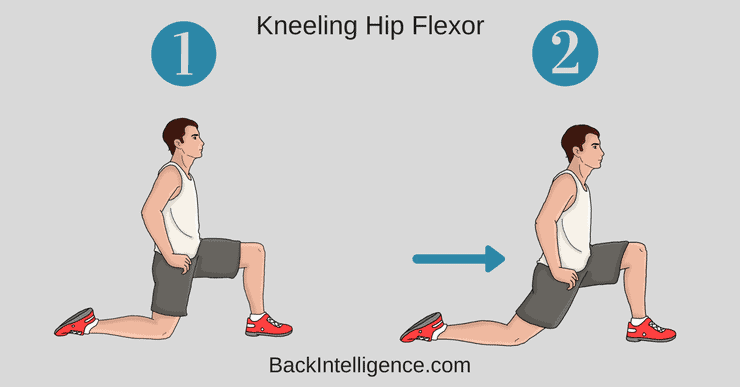
1. Kneeling Hip Flexor Stretch
This stretch helps to lengthen tightened hip flexors that are often seen in individuals with anterior pelvic tilt.
How to do it:
- Begin this stretch by kneeling on a soft surface.
- Bring your right leg in front and place your foot flat on the ground so that your knee is positioned over your ankle.
- Your left knee should remain in contact with the soft surface and should be bent at 90 degrees.
- Slowly slide your right foot forward a few inches while bracing your core.
- Squeeze your right gluteal muscles and shift your hips forward.
- Your left knee should now be bent slightly more than 90 degrees.
- Hold the end position for 10 seconds.
- Aim for 10 repetitions of this stretch and perform it on both sides.
2. Child's Pose
This stretch releases the back muscles such as Latissimus dorsi - which is usually tight during anterior pelvic tilt.
How to do it:
- Begin by positioning yourself on the floor on your hands and knees with your knees slightly wider than your hips.
- Turn your toes inwards to touch and push your hips backwards while bending your knees.
- Once you’re in a comfortable position, straighten your arms forward and allow your head to fall forwards into a relaxed position.
- Hold this position for 15 to 20 seconds.
- Slowly return to the starting position.
- Aim for 3 repetitions.
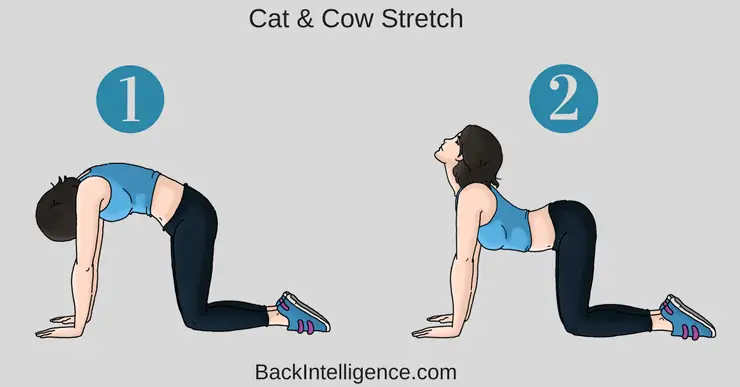
3. Cat & Cow
This stretch helps to stretch out the tightened muscles in the back (Erector Spinae) that accompany anterior pelvic tilt.
How to do it:
- Begin this stretch on your hands and knees.
- Inhale and let your stomach “drop” towards the floor as you look up towards the ceiling.
- Exhale and slowly round your spine while pressing into the floor with your hands and slightly curving your neck to look at your feet.
- Aim for 5 repetitions of this stretch.
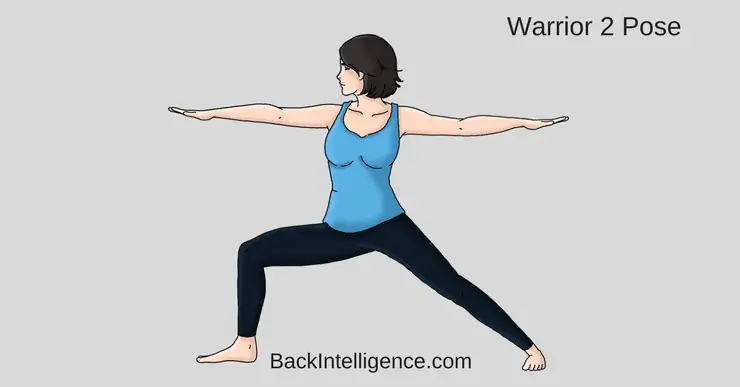
4. Warrior 2 Pose
This pose helps to strengthen the legs, and opens up the hips, including the TFL muscle.
How to do it:
- From the Five Pointed Star position, turn your right toes towards the wall on your right and bend your right knee over your right ankle.
- Turn your hips and shoulders towards the front and reach out towards the walls on your side.
- Turn and look towards your right middle finger.
- Press into your feet while keeping your legs strong.
- Sink your hips down towards the floor and reach for the top of your head to help lengthen your spine.
- Relax your shoulders down and back and press your chest forwards.
- Hold this position for up to 60 seconds.
- Slowly straighten your legs and turn your feet forwards, coming back into the 5 pointed star position.
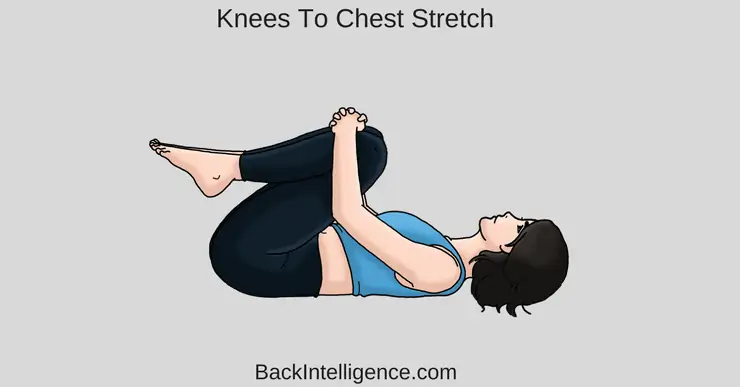
5. Double Knee to Chest
This stretch helps to relieve tension in the lower back by stretching the muscles (Spine extensors) that are often tightened in individuals with anterior pelvic tilt.
How to do it:
- Begin by lying on your back on a mat with your knees bent and feet placed flat on the floor.
- Position your right hand behind your right knee and slowly pull your right knee in towards your chest and then bring your left knee in towards your chest.
- Hold this position for 15 to 20 seconds.
- Relax and slowly lower one leg at a time to the starting position.
- Aim for 3 repetitions of this stretch.
The Complete Low Back Fix (With Dr. Oliver, DC)
Ease your Low back pain, gain mobility and get back to the things you enjoy doing.
Learn More
Now, 5 Strengthening exercises to correct it:
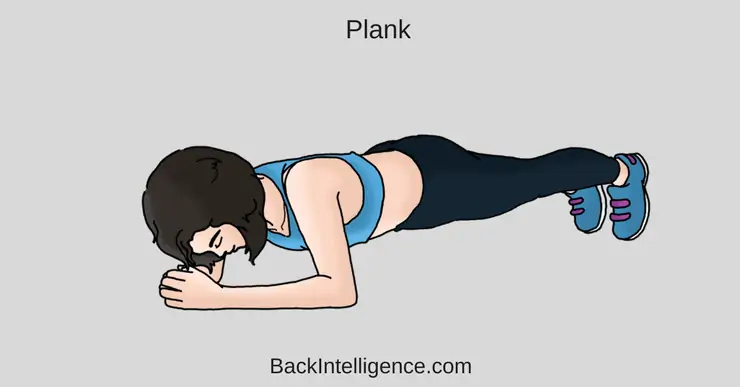
1. Plank
This exercise is ideal for strengthening both your deep core and gluteal muscles.
How to do it:
Begin lying on your stomach with your forearms against the mat.
– Engage your core and lift your body so that you are resting on your forearms and toes.
– Ensure that your spine is in a neutral spinal position (not sagging in low back, or lifting butt in the air).
– Hold the plank position for 20-30 sec, Then lower down to floor.
– Aim for 2 to 5 repetitions of this exercise.
** Ensure to keep your back straight throughout the entire exercise.
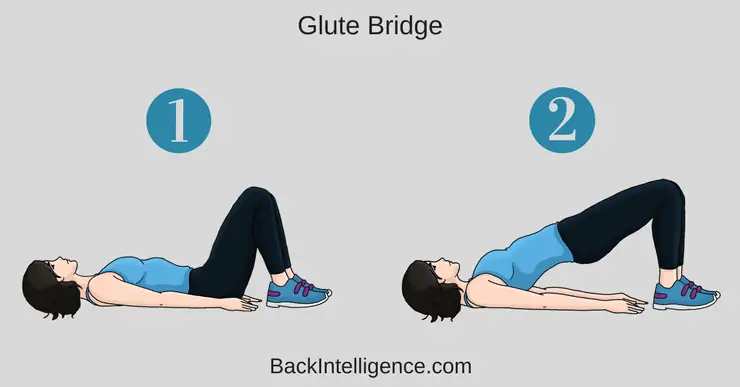
2. Glute Bridge
This exercise helps to strengthen both your core, gluteal and back muscles.
How to do it:
Begin lying on your back on the floor with your knees bent and feet positioned flat on the floor with your arms positioned beside your torso.
– Brace your core and squeeze your butt before any movement.
– While bracing, lift your butt off the floor, and continue squeezing your butt.
– Hold this position for 5 seconds and return slowly to the starting position.
– Aim for 10 repetitions.
**Don’t hyperextend during this movement, you should feel your glutes firing.
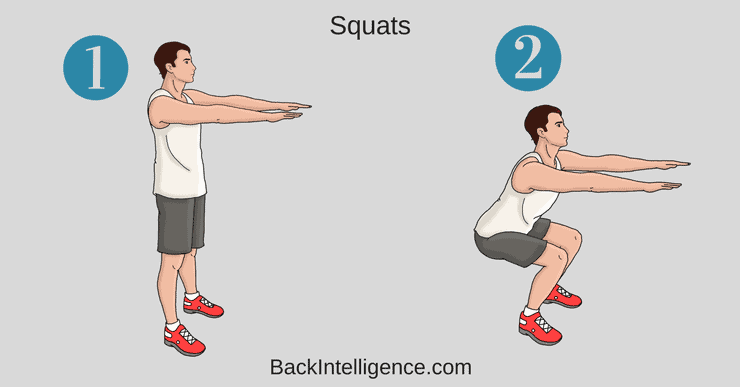
3. Squats
This full-body exercise helps to strengthen your gluteals, hamstrings, and back, among other muscles.
How to do it:
– Begin in a standing position with your feet positioned about shoulder width apart.
– Look straight ahead and brace your core.
– Keep your abdominals tight, then hinge at your hips and bent your knees to about 90 degree angle (as if you’re sitting).
– To come up, use your legs first and then follow through with your glutes (squeeze your butt). – Aim for 10 to 15 repetitions.
**We don’t recommend squatting past 90 degree angle. Even small range squatting will strengthen your muscles.
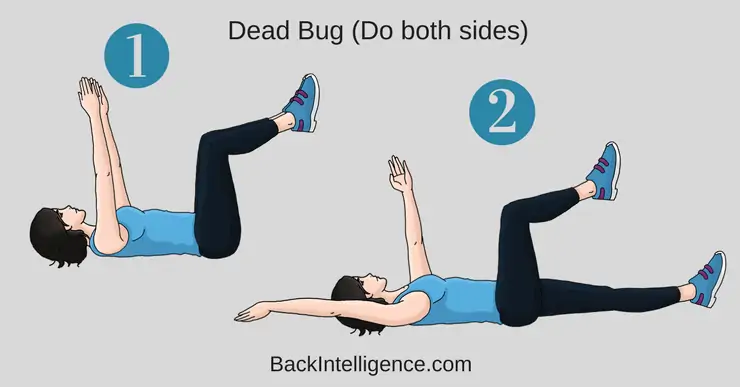
4. Dead Bug
This exercise helps to increase deep core strength, and it also helps to improve hip and trunk stability.
How to do it:
– Begin lying on your back with both arms extended towards the ceiling.
– Lift your legs off the floor to 90 degrees.
– Exhale to bring your ribcage down and try to flatten your back onto the floor by rotating your pelvis upwards and bracing your core muscles (this is the starting position for this exercise that you need to hold throughout the movement).
– Start the exercise by extending your left leg, straightening at the knee and hip and bringing the leg down to just above the floor (don’t let your lower back arch); at the same time, lower your right arm back to just above the floor.
– Keep your abdominal and gluteal muscles tightened and return your left leg and right arm to the starting position.
– Repeat with your right leg and left arm.
– Alternate sides for 20 repetitions.
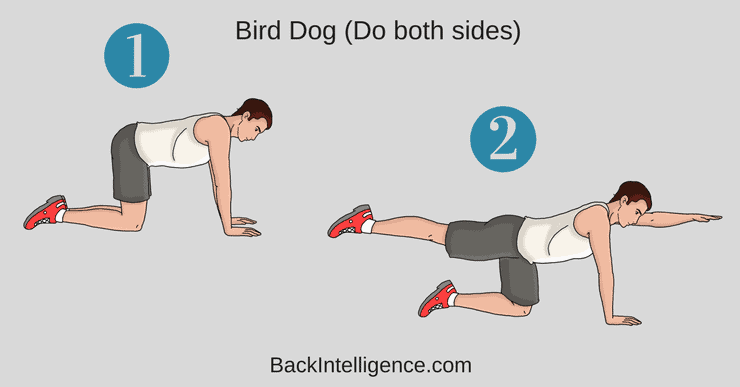
5. Bird Dog
This is a great exercise to improve core strength and lumbar back muscles.
How to do it:
– Begin on your hands and knees, with your hands positioned under your shoulders and knees positioned under your hips.
– Brace (contract) your core as hard as you can before beginning any movement.
– While bracing your core, raise your left arm and reach it forwards until it is aligned with your torso; at the same time, kick your right leg backwards until is it aligned with your torso.
– It’s important to not arch your low back as you do this.
– Hold this position for 2-3 seconds before slowly returning to the starting position.
– Repeat with your right arm and left leg.
– Alternate sides for 10 repetitions.
** Only extend your arm and leg to where it’s comfortable and don’t arch your low back.
In Conclusion
If you have an anterior pelvic tilt performing some simple stretching and strengthening exercises can help to correct it.
Correcting your pelvic positioning will not only aesthetically look more pleasing, it will also help to minimize any back and lower extremity pain you may be suffering from.
Check out these Anterior Pelvic Exercises:
If you have low back pain it could be caused by having anterior pelvic tilt posture. Try to find your “neutral” pelvic position when sitting and standing through out the day.
Learn More
Related:
How to fix posterior pelvic tilt
How to fix forward head posture
Herniated disc exercises
How to ease low back pain naturally
Back Intelligence Homepage
Sources:
https://www.ncbi.nlm.nih.gov/pmc/articles/PMC3820203/
https://journals.lww.com/nsca-scj/fulltext/2010/08000/Exercise_Strategies_to_Prevent_the_Development_of.6.aspx
https://pdfs.semanticscholar.org/0213/288e3772f12e7673dd3f8702f6cab9d98345.pdf
Licensed chiropractor, DC (Owner of Forme Clinic, Stoney Creek, ON, L8G 1B9)
Dr. Shaina McQuilkie graduated from Brock University in 2004 with a Bachelor of Kinesiology (Honours). She then attended D’Youville College, in Buffalo, New York and obtained her Doctorate of Chiropractic Degree in 2008. After graduating, Dr. McQuilkie practiced in a multi-disciplinary healthcare facility based in Hamilton, Ontario gaining experience treating a variety of musculoskeletal injuries.
