While a posterior pelvic tilt isn’t as common as an Anterior pelvic tilt, it still affects a lot of people and can have some pretty serious consequences.
What is Posterior Pelvic Tilt?
Posterior pelvic tilt refers to a condition where your pelvis is tilted backwards, away from its’ neutral position. In this pelvic position, the tailbone is tucked in under the body and the front (anterior) portion of the hips tilt up and back.
The posterior (forward) positioning of the pelvis results in a rounding of the lower spine (lumbar lordosis), leading to a flat back.
Why is posterior pelvic tilt bad?
Firstly, it affects your posture as a whole because your upper back and neck try to compensate for the abnormal pelvic position and are pushed forward.
Generally, if you have a posterior pelvic tilt, you’ll also likely have an increased rounded shoulders (aka Thoracic Kyphosis) and a forward head position.
Over time posterior tilt will increase the compression load on the mid and lower back. This increased compression load means that the spine is unevenly loaded, which can lead to injuries including disc prolapse or disk herniation.
Additionally, the rounding of the lumbar curve puts excessive pressure on your spine and can lead to hip, back and leg pain. It can even affect the way your clothes fit you and your self-confidence levels.
If you’re not sure if you have posterior pelvic tilt, you can perform the Thomas test (below). To do this effectively, you’ll need a friend to observe how your body reacts of you’ll need to take a video of yourself to watch afterwards.
- Sit on the edge of a table
- Grab both of your knees and lean backwards until your back is flat on the table
- Let go of one of your legs and extend at your hip until the back of your thigh touches the table
Negative Test (Meaning you don’t have a posterior pelvic tilt)
- The back of your thigh touches the table without a gap between your thigh and table.
Positive Test (Meaning you might have a posterior pelvic tilt)
- If you have a gap between your thigh and table even after straightening your leg you may have posterior pelvic tilt.
5 Causes of Posterior Pelvic Tilt
MOST COMMON: Poor Sitting Posture
If you sit all day, you’re already at risk of a posterior pelvic tilt, but if you sit with poor posture you’re even more at risk. Sitting in a slouched position at your desk all day distorts the normal curvature of your spine and puts stress and strain on all the wrong areas. This leads to weakening of the hip flexors and back muscles. And the hamstrings, gluteal and abdominal muscles get very tight.
Other causes include:
Poor Standing Posture
Just like with the sitting posture, proper standing posture is crucial. If you find yourself rounding your lower back and hunching your shoulders when you stand, then you may have a posterior pelvic tilt posture. You will most likely find your upper body is leaning back more and the abs will feel shortened.
Holding/Carrying Heavy Objects (Like a baby!)
If you are holding heavy objects for extended periods of time, you could develop a posterior pelvic tilt posture as well. Usually your tailbone will tilt forward (or “under”) as you try to support the “heavy object” with your hips. This elongates your back, and shortens the abdominal muscles. Over time this will cause serious postural problems.
Incorrect Exercise Regiment
If you’re participating in an exercise program that focuses on developing your gluteals, abdominal muscles, and hamstrings you might be putting yourself at risk for posterior pelvic tilt. When the abdominal muscles become overdeveloped compared to the counterbalancing back muscles, they can pull the pelvis posterior and cause a flattening of the normal curve in the lumbar spine.
Sleeping Posture
If your mattress or sleeping position restricts the natural curve of your spine, you could develop a pelvic tilt. Related: How to sleep with lower back pain
Stretching and Strengthening to Correct Posterior pelvic tilt
The best way to correct a posterior pelvic tilt is to balance the muscles affecting the abnormal positioning of the pelvic. Muscles that are chronically tight need to regain their flexibility through stretching. While the muscles that are weak need to be strengthened.
The main areas that may need stretching: Abs And Hamstrings.
The main areas that may need strengthening: Glutes, Deep core muscles and Hip flexors/Quads.
7 Exercises to Correct Posterior pelvic tilt
1. Seated Hamstring Stretch
Hamstrings can become tightened with prolonged sitting and standing, leading to poor postures including a posterior pelvic tilt. By stretching out your hamstring, you’re lengthening the muscle and allowing the body to maintain a more neutral pelvic position.
How to perform it:
– Begin in a seated position on a hard chair
– Stretch your left leg out in front of you
– Bend forward and reach for your toes, to the point where you feel a slight stretch
– Hold this position for 15 to 20 seconds
– Slowly return to the starting position
– Repeat on your right side
– Aim for 3 repetitions on each side
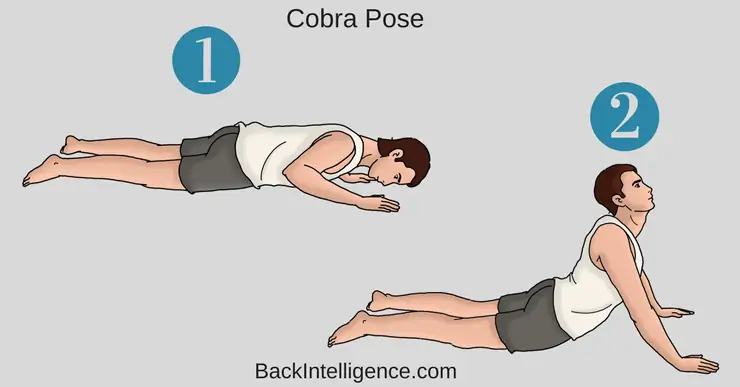
2. Abdominal Press Up (Cobra Pose)
This stretch will help to stretch out your tightened abdominal muscles, helping to lengthen them allowing for a more neutral pelvic position.
How to perform it:
– Begin lying on the ground with your hands flat on the floor at the level of your shoulders
– Slowly push your hands to raise your shoulder off of the ground until you feel a slight stretch
– Increase your range of motion by exhaling as you push further into lumbar extension
– Aim for 5 repetitions
The Complete Posture Fix (With Dr. Oliver, DC)
Correct your Posture and Ergonomics, Ease Back & Neck pain and Increase your mobility.
Learn More
3. Lunges
Lunges help to strengthen your glutes and quads.
How to perform it:
– Begin by standing with your feet together
– Step your left leg out in front of you
– Bend your left leg to a 90 degree angle (your right knee should touch the floor while your left leg is at 90 degrees)
– Push up on your left leg to return to the starting position
– Repeat on your right side
– Aim for 3 sets of 10 lunges on each side
** Ensure that your knee doesn’t pass the level of your toe while in the lunge position, because this position increases stress on the knee
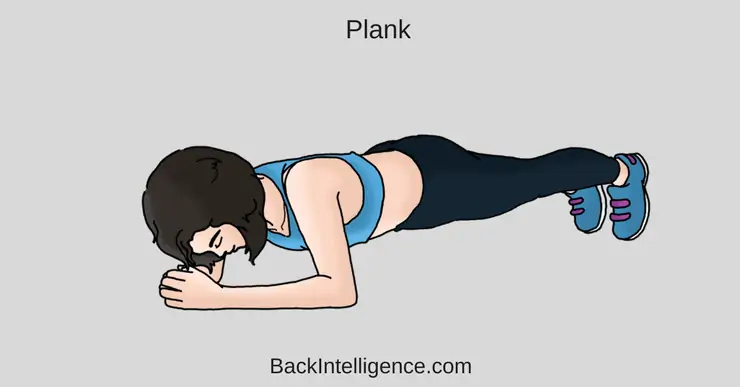
4. Plank
This exercise is ideal for strengthening both your deep core and gluteal muscles.
How to do it:
Begin lying on your stomach with your forearms against the mat.
– Engage your core and lift your body so that you are resting on your forearms and toes.
– Ensure that your spine is in a neutral spinal position (not sagging in low back, or lifting butt in the air).
– Hold the plank position for 20-30 sec, Then lower down to floor.
– Aim for 2 to 5 repetitions of this exercise.
** Ensure to keep your back straight throughout the entire exercise.
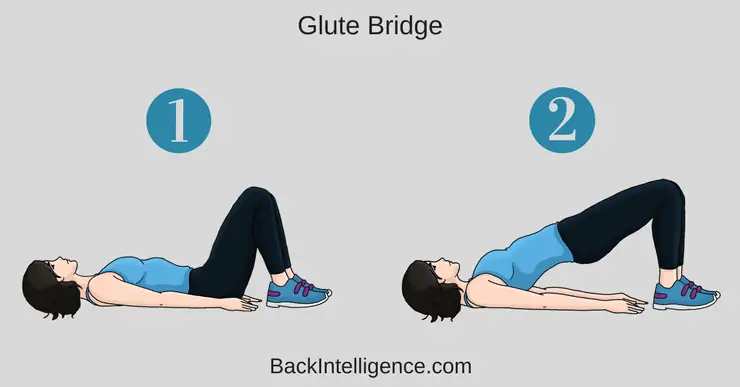
5. Glute Bridge
This exercise helps to strengthen both your core, gluteal and back muscles.
How to do it:
Begin lying on your back on the floor with your knees bent and feet positioned flat on the floor with your arms positioned beside your torso.
– Brace your core and squeeze your butt before any movement.
– While bracing, lift your butt off the floor, and continue squeezing your butt.
– Hold this position for 5 seconds and return slowly to the starting position.
– Aim for 10 repetitions.
**Don’t hyperextend during this movement, you should feel your glutes firing.
6. Leg Raises
Leg raises help to strengthen your hip flexors which can get weak from Posterior tilt of the pelvis.
How to perform it:
– Begin by lying flat on the floor with your legs straightened.
– Slowly raise your legs off the ground, by using your abdominal muscles, and allow your lower back to arch from the floor while keeping your arms straight at your side.
– Slowly return your legs to the starting position.
** the key to this exercise is to only move your legs, this allows for the development of your core muscles.
** this exercise is quite difficult, if you have pain when lifting your legs, try bending your knees slightly
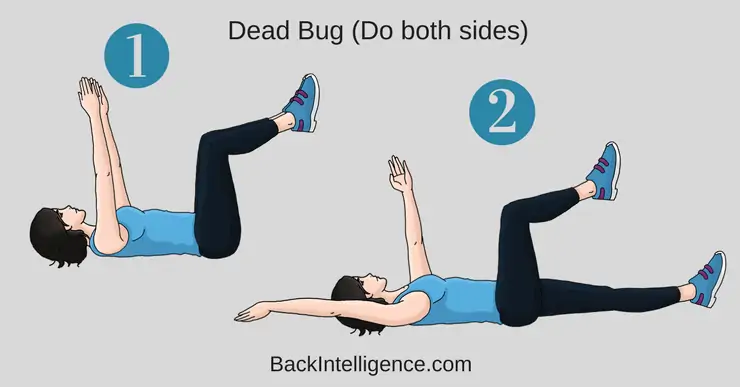
7. Dead Bug (Alternate both sides)
This exercise helps to increase deep core strength, and it also helps to improve hip and trunk stability.
How to do it:
– Begin lying on your back with both arms extended towards the ceiling.
– Lift your legs off the floor to 90 degrees.
– Exhale to bring your ribcage down and try to flatten your back onto the floor by rotating your pelvis upwards and bracing your core muscles (this is the starting position for this exercise that you need to hold throughout the movement).
– Start the exercise by extending your left leg, straightening at the knee and hip and bringing the leg down to just above the floor (don’t let your lower back arch); at the same time, lower your right arm back to just above the floor.
– Keep your abdominal and gluteal muscles tightened and return your left leg and right arm to the starting position.
– Repeat with your right leg and left arm.
– Alternate sides for 20 repetitions.
In Conclusion
Posterior pelvic tilt can have a detrimental impact on your spinal health. By stretching out shortened and tight muscle and strengthening inactivated and weakened muscles, you’ll be on your way to a more neutral pelvic position and a healthier spine.
The Complete Posture Fix (With Dr. Oliver, DC)
Correct your Posture and Ergonomics, Ease Back & Neck pain and Increase your mobility.
Learn More
Related Articles:
How to correct rounded shoulders
Fix forward head posture
How can poor posture cause back pain
Sources:
https://www.ncbi.nlm.nih.gov/pmc/articles/PMC3944314/
https://www.ncbi.nlm.nih.gov/pmc/articles/PMC5342962/
Licensed chiropractor, DC (Owner of Forme Clinic, Stoney Creek, ON, L8G 1B9)
Dr. Shaina McQuilkie graduated from Brock University in 2004 with a Bachelor of Kinesiology (Honours). She then attended D’Youville College, in Buffalo, New York and obtained her Doctorate of Chiropractic Degree in 2008. After graduating, Dr. McQuilkie practiced in a multi-disciplinary healthcare facility based in Hamilton, Ontario gaining experience treating a variety of musculoskeletal injuries.


